Introduction
At the VWEuro '98 I stumbled across a crate with a lot of junk in it. It turned out to be a virtually complete Eberspächer BN4 heater for a bus. Even the vintage ('77) was about right for my bus ('76). At first I hesitated. These units are renown for their unreliability. On the other hand, sometimes I just could not achieve a decent heater output. The beetle derived heat exchangers on my humble 1600cc are just not up to the task of heating the larger bus interior. I had accepted this as one of the few development faults, as I use the bus for summer/hobby use only. But a couple of years ago, after a meeting in Switzerland (Schwartzsee), where the temperature dropped to a -8 degrees Celsius at night, my interest for an efficient heater which could also run stationary was very much alive!! Being an original option for these vehicles (factory installed up to '72, and dealer installed up to '79) I decided to go ahead. The asking price was friendly $60. After some traditional haggling (hey, I am Dutch you know!!) he agreed on $50. I picked up the crate and thought, "Well, I'll give it a go, if I can find the right info..."
First Sight
Within five minutes I found out that its dashboard knob was missing. Being at Europe's biggest swap meet has its advantages; Michel, a long term fellow bus fanatic, dug it up after 30 minutes. A smaller piece of the fresh air ducting was missing too; the guy I bought it from was there with the bus he took it off. The duct was still riveted to his car, but he did not want to take it off for me...even if I offered him $10 for it. Strange guys, those Germans...
A Word about Prices...
Afterwards I found out that in Germany these heaters are checked as a part of the TUV (MOT or APK) road safety check. As a result of German traffic law, the heat exchanger of each fuel heater needs to be renewed every 10 years. For the older types, such as BN4 or BA6, these are no longer available. Very little imagination is needed to comprehend why more complete "German" heaters turn up for sale. So my experience can be duplicated, provided you live in Europe...
Abroad prices are sometimes really stupid; one guy in the UK asked $450 for a used BN4, while I saw a NOS early BN4 complete to the last bolt lying also at VWEuro '98 for $330. At this year's VWEURO I spotted various units lying around (also for Beetle, even 6 volt and Type 3). Also bear in mind that these units were fitted for the Scandinavian market as standard equipment. I imagine that the same applies for a lot of vehicles sold in Canada. Finding a good candidate is not impossible. And make sure you buy the right type: the unit fitted to the 181 or thing looks the same, but the ancillaries sure aren't--although I must admit that the heater itself, if decently priced, is a good parts unit.
Having a parts heater lying around is a good idea anyway; I bought one for $30. It has already earned its keep, but I will get to this later. However make absolutely sure that you are buying a complete BN4. When a part is missing think if you can replicate it. If ducting is missing remember that this is generally hard to make up yourself. Also make sure that the identification plate is present on the heater itself. If it is missing this could indicate the removal by German TUV authorities because of serious failures...
The Quest for Info
Because you are reading this article you already must have found Ron's share of info about this topic on the Web, which was a great knowledge boost, because I started from scratch. I would advise you to thoroughly read these two articles first before attempting any testing or installation work.
It took me a couple of days to find more useful sites. The Dutch Eberspächer dealer has no info nor parts left of these older types. With some toggling I found the site of the factory again; no parts left. But I was put through to a man whom I explained why I called. He was very friendly, and told me to wait for what he could find. This turned out to be a complete installation guide, with templates for the necessary holes, electrical plan & fault finders' guide, and some documentation about their newest models of course!! Later I found out that a fellow LVWCN club member had an original VW workshop BN4 manual with all the updates. After I spent some time at the copy shop I now have my own copy.
Initial Work
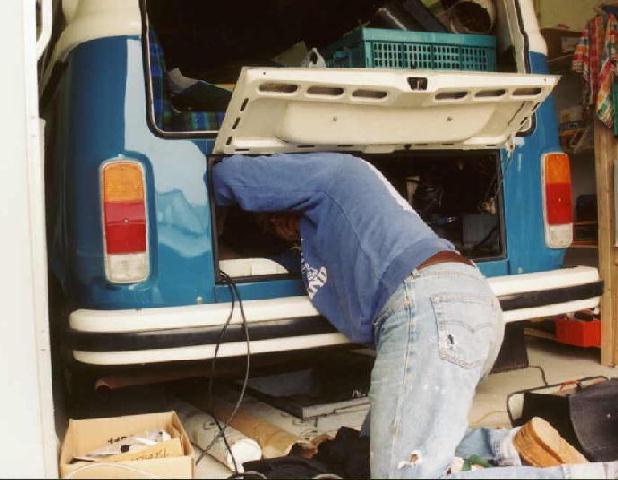
Photo below: Me merrily hacking away! A typical shot of the installation: bus eats man!
Armed with this knowledge which I soaked up to be on the safe side, I decided it was time to find out if this heater was for real by testing it. Please make sure you are performing your test safely. You are working with fuel, a battery and a fan, which spins at high speed (more than 4800 rpm). You do not want to set your car or garage/house on fire, nor do you want to chop up your fingers with the heater's fan. I followed the hints in Ron's articles to set up a test situation. I also connected the temperature-regulating switch to assess if everything performed ok. After the pump had sucked enough fuel from the secure container (a 5 liter plastic jerry can) to deliver some to the heater, it started up like a dream... And there I was; on my driveway at 8:20 PM on a November night jumping up & down... This hobby is sure more involving than stamp collecting!!!
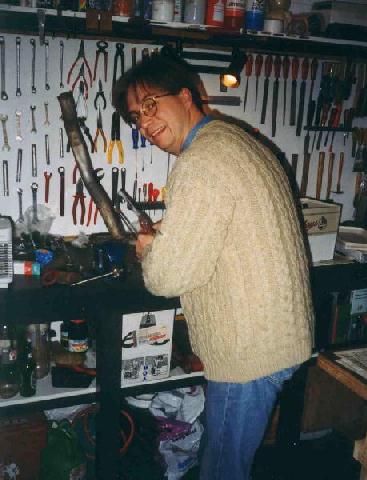
Fabrication
This sure is also true for the fabrication of certain parts. The top cap of the fresh air duct was missing (my BN4 is the recirculating version) and although I had a complete exhaust it was sure no longer serviceable, both items are no longer available new.
The exhaust of the later type is directly behind the rear wheel. Unless there is a mudflap it will get the full spray from the wheels. This frequently results in detrimental effects. I was lucky that only the upper part was terminally moth eaten. After some reviving the lower part looked excellent with some Hammerite brand paint. The exhaust lower part is made of considerably heavier gauge steel, so it survives longer.
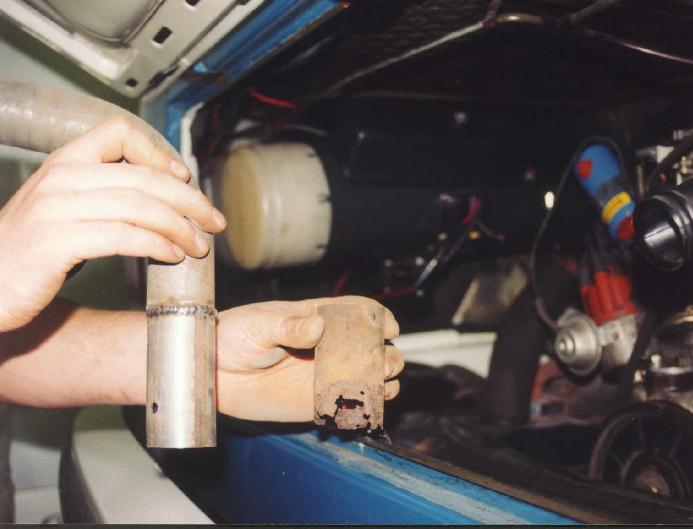
![]()
Some digging in the trash container at my VW dealer (who is also a VW nut) revealed that some used Golf exhaust tubing virtually matches the old diameter of the (thinner) upper part. I used a straight section which comes from the part between the cat and the muffler. With an angle grinder and a hacksaw I cut it to the required length.
The curved part, which attaches to the unit, was reusable. This is very convenient because of the specific joint which incorporates a clamp and asbestos ring (handle with care!!) I drilled the holes in the "Golf" tubing for the mounting of the lower exhaust part. Here you need to carefully assess where to drill them, otherwise the pipe won't line up properly when you install everything. My neighbor was so friendly to weld the two pieces together.
Photo below: Preparing the Golf tubing to accept the Eberspaecher version.
Below: The restored tubing before painting with hammerite (this proves still to be heat resistent).
Next up was the fresh air cap. In the panel where you need to cut for the inlet, there is a recession where the cap fits over. It is very awkward to take measurements here; you need to impersonate the snakeman here, who has an extra wrist and rubber vertebrae. I reproduced these dimensions on cardboard, so that I could produce a model. Jos, a friend of mine, duly reproduced this in metal. Just to be sure he made two.
Drilling & Cutting
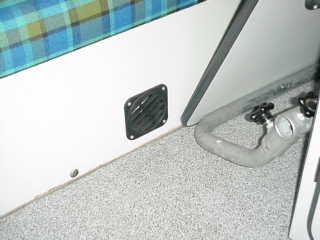
Because my bus is retrofitted with a Westfalia interior, I needed to extend the hot air outlet under my couch. The unit I found came out of a nine seater, so with the general unavailability of parts I needed to be creative. A visit to the Eberspächer dealer yielded the parts which I could use for this. Although they are from the current type of heater, the can be made to fit with some patience. A piece of insulated tube is used for the extension under the seat and a vent is mounted in the front kick plate of the couch. This is an adjustable vent, so the hot air can be directed in the desired way.
Now it was time to take out the cushions, I left the rest of the couch assembly in place. This meant that I had to work in a more uncomfortable position, but in the end it turned out fine. I also took out the left rear trim for the recirculating hole, where my fabricated cap should go. I started to "mirror" the templates onto my bus with a felt pen. Working very, very close to your fuel tank means that the dimensions need to be spot on!! In my opinion you absolutely need to have those templates in order to successfully install the heater.
Then I drilled literally hundreds of 3mm holes just inside of the part scheduled for cutting (near the tank remember?!).
Photo below: Overview with Westy couch/hinges in place.
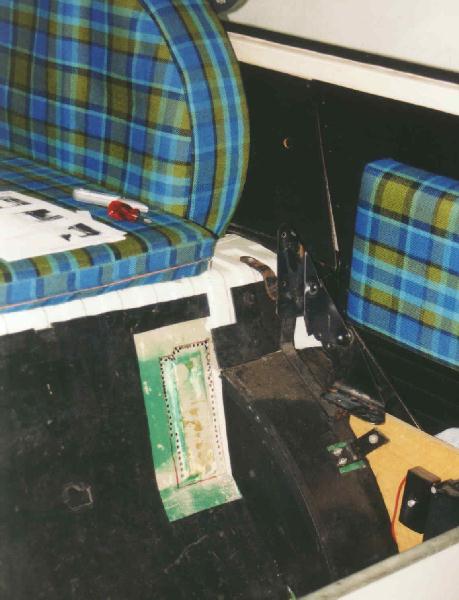
Photo below: Stamp-like pattern, ready to be chiseled out.
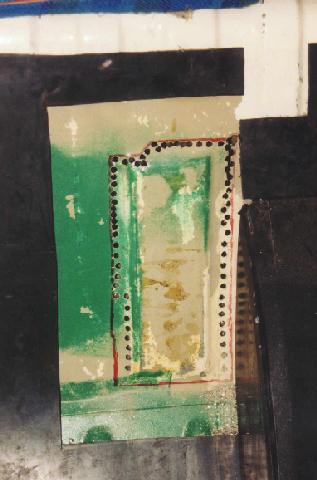
Photo below: View backwards with cut-out and tank. Flanges unfinished.
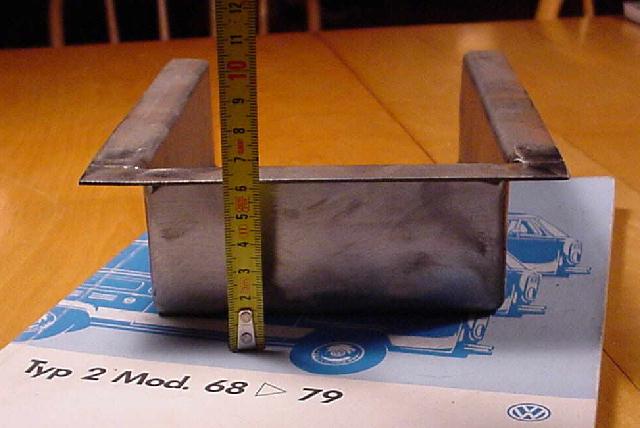
If you do this consistently and drill the holes as close to each other as you can, you can easily chisel the section out. For this I used a special cold chisel (pictured below) which is used in auto body shops.
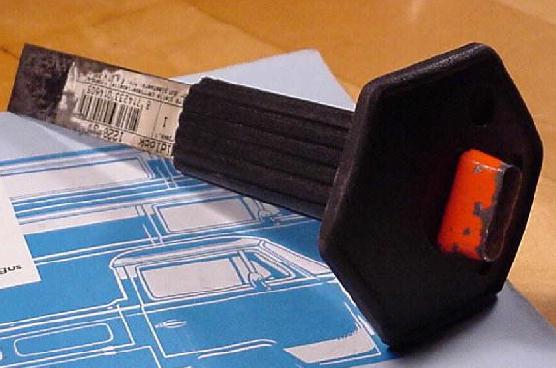
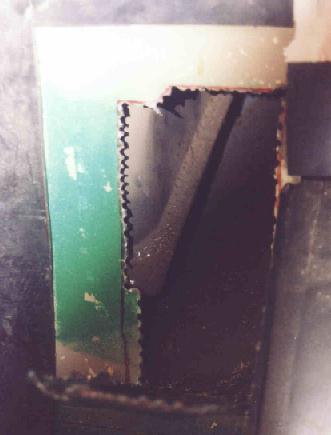
It is frighteningly sharp, so take care and wear safety goggles. You do want to enjoy your work when you are done, don't you?? Because it is extremely sharp, the metal does not distort and with some filing you will be able to obtain the right size of hole. Once you have cut out the first hole you can peek inside to see what's going on at the backside you are working on...
Photo below: Checking on the progression seen from the engine area.
I started to drill/chisel/file the firewall in the engine compartment first, because Ron told me that you had the most of space (to the tank). I observed the engine compartment before I started and I judged that it could be done with the engine in situ, although the factory manual states that the engine has to be taken out. I certainly agree that this works far more comfortable but I had some experience with my fresh air cap measurements so I already had tested my "rubber" spine.
With the firewall hole made, I first made a few conservative drills on the "other" side, under the couch. I felt comfortable working in this way; after each hole I could see where I was, compared to the tank's position. Be sure to start at the top end of the hole. Because the bottom section is very close to the tank as well as the rear wheel well. With the templates marked out with felt pen you know where you are going. The lower part of this hole I carefully chiselled out. Once both the holes are there you have to crawl under your car to drill the hole for the bowden cable to operate the temperature-regulating switch.
Again, double check your dimensions with the templates (either from Ron or Me) and mark in advance with your trusty felt pen. Because this panel is slightly curved you need to centre the position here before you can successfully drill the hole. As an exception to the rule the grommet where the bowden cable goes through can be ordered through your VW dealer (at least in Holland). The other hole for the cable, as you might expect, has to be drilled at an even more awkward position; above your brake master cylinder!! Hint: slide a piece of copper pipe over your drill so you won't protrude too far (about 10mm). In order to drill this one you need to take out your front seat. By this time your bus looks pretty messed up...
I wanted to obtain the most original result possible, so I also drilled & chiseled out the two holes for the exhaust & air intake pipe. I felt most comfortable drilling upwards, with safety goggles. There was enough ground clearance to crawl half under the panel you need to work on. Because I found the recirculating version I also made a hole in the D-post. Although you need to follow to cut along the recession in the panel here (on my '76) I made sure to double-check it with my templates. Better safe than sorry.... Because the edges of the hole are visible through the intake grille I took my time to dress up the edges & the inside of the fresh air intake cap.
Transferring the hole on your trim panel also took some time, again using the templates and double-checking. I found out that the template was about 1 inch off the actual location in the panel, so I modified the template a little. In Holland (Europe) interior trim for buses is generally very hard to find. And if available and in decent shape, it is priced rather hefty (read: expensive).
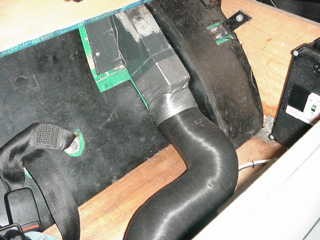
Mounting the ducting
Although I had also templates for the heater mounting bracket, I only used them as a reference. I first mounted the ducting next to the tank and connected the temperature-regulating switch. Make sure that the tank compartment is sealed off decently when everything is in place. For this I used an old bicycle tube which I cut to size and glued with clear silicone. Silicone swells up when it comes in contact with fuel. Nice characteristic I think... I used stainless steel screws in all the original holes. There are not that many screws anyway, so using all the possible mounting points seemed like a good thing to me. One screw kept me busy for about two hours; it was located on the firewall's end on top of the duct. With the engine in this was difficult to get a grip on. But I doubt if things would improve if the engine were out.
Next I tried the heater for measurements. Everything lined up wonderfully. I marked off the mounting holes for the bracket and mounted the unit. Psychologically this was a milestone to me, so I celebrated this with a beer... Now I could try the exhaust and fresh air ducting for alignment. The fresh air duct needed some persuasion to fit properly, but in the end it fitted nice. I was glad that I had taken so much time taking measurements for the fresh air cap. After fitting the cap inside the D-post (I had to take the heater out again) the duct would slide firmly into place. Filling with silicone kit I sealed the fresh air cap joint through the D-post hole. Next I riveted the grille into place and put back the trim.
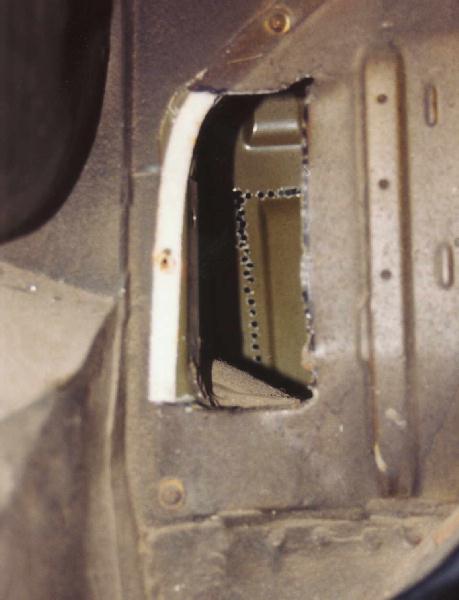
Photo shows the location of the fresh air intake from a parts donor bus (grille opening now blocked by insulation):
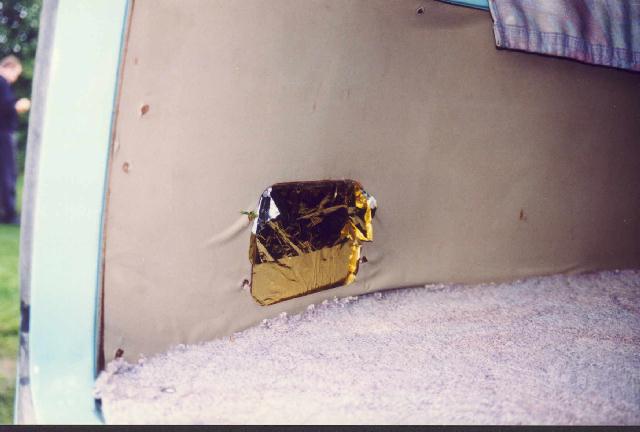
Photo below: Fabricated fresh air intake cap.
The exhaust with the welded section lined up like new. I had the grommet with the exhaust so no dirt can enter through the hole and the panel is protected against rubbing of the exhaust. For the late model BN4 heater, this is part# 181 261 185A. If it is missing, you can order it from your local VW dealer. It is not vital but very convenient if it comes with your unit. Installing the fresh combustion air intake was very easy. Just screw it to the bodywork and slide the flexible hose into place.
Next up was the fuel line. I made a cut and insert a T-piece under the car. This required an extra hole (& grommet!!) to get the fuel line out of the engine compartment, but if something would go wrong with the T-piece it would leak outside the hot engine bay. I am a fan of keeping fuel lines as far away as possible from hot items. I used new fuel lines throughout and secured everything with clamps and tie wraps to be sure.
Wiring
Photo below: My dash with knob.
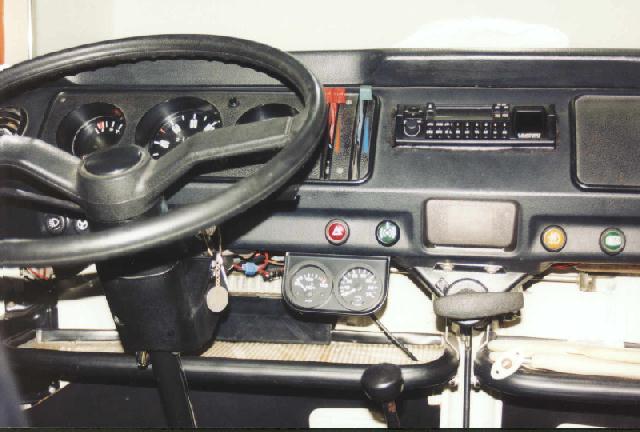
I had to drill the hole for the stock switch. Again I drilled a smaller hole and filed it to size, taking care it would line up properly. If you have a padded dash, you have to crawl under your dash and check the backside where the corresponding hole is pre-cut. On my plain-metal dash I had to carefully measure out (anybody got a decent padded dash for my '76 out there?? EMail me!) and cut the hole. Because I had the wiring loom from the switch to the fusebox this went pretty smoothly. I only had to install one wire from the front to the heater for the starting up sequence; this took some time to install neatly. It took me approximately 6 meters of cable to complete the job.
On the Road
With all installation work completed I tried the heater stationary. Now I found out I had installed the wires for stationary use (with engine off, with "egg-timer") and normal use the wrong way around. After swapping terminals, this little gremlin was sorted. The heater starts whizzing as soon as you turn it into the "egg-timer" position. The fuel pump ticks and after some seconds (it was April, warming up in mid-winter takes longer) you hear a sort of mini-jet afterburning in your bus... The heat oozes into your car and thoroughly warms the interior in minutes. Mind you: do not perform such tests in a confined space!
With my BN4 in the back I now only use the stock heater boxes to demist my front screen. The heater is perfectly capable of maintaining a comfortable temperature in my car. Although I directly admit I do not use my bus during winters and I have taken great care insulating the interior and closing off all draught holes. The noise it makes is very acceptable at speed. During the heat up and cool down sequences you sometimes hear the metal ducting ticking. Fuel consumption is also very moderate. When I drove through Paris this year on my way to Portugal I still achieved 10km to a liter with the heater working. The temperature switch was set below half power.
In general, you hardly notice the thing working in the back...apart from the heat that is!!
First Break Down
Yep, this also happened. In Portugal it rained pretty hard and temperature was 14 degrees Celsius. So the decision was made to leave the mountains and head for the sunnier coast. The heater would not start. It had cut out by itself already some times before. Luckily the weather improved later that day.
I had taken my Eberspächer manuals with me, so with a test lamp I could perform an error check why it would not run. It turned out to be that the temperature regulating switch did not make contact anymore. This prevented the heater from starting up. Later, on my way back home I made a shortcut and cut the switch off. With thrusts of approximately 120 seconds I was able to warm up the car by switching the heater on/off, while my girlfriend Barbara drove. If things would overheat, there would still be the overheating switch as a safe guard. But understand me correctly: I sure do not advise running the heater in this set up. The clue to a long-term relation with a functional heater is keeping all the original safeguards in working order. I only made this conversion to get home and be able to warm up the interior if necessary.
Now came my spare-unit into play. I had an extra switch lying in the attic. Sad thing was that I had to take out the complete heater in order to replace the faulty unit. I guess just a case of Murphy's Law. Why it broke down is not clear to me: it could be because of some bad Portuguese roads, normal wear & tear or just bad luck. Anyhow, it has run perfectly ever since.
Stationary Use
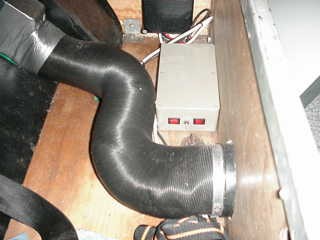
Still I had one wish: it would be perfect if I could run it on chilly nights on city power (in Europe 220V). A friend of mine, Albert, is a wizard with electrics because of his profession. He drew up a scheme with a 14 ampere 12v source, which runs on 220V. With a smart relay set up I now run the unit on my battery when not connected to 220V. As soon as 220V is detected the heater is fed with current from the 12V source. I now only need to enter campsites with a full tank of gas. Now that's original heat!!!
Albert made sure to incorporate all the other electric equipment in this setup. So my radio, interior lights, water pump and fridge all benefit from this clever piece of electrical engineering. You know, this hobby is all about one thing leading to another...
Back to Main