Solex 34 PICT-3 Replacement
This article will tell you how to remove or replace the Solex 34 PICT-3 carburetor on your 1600cc dual-port Type 1 Volkswagen engine. The 34 PICT-3 was the original equipment carburetor for this engine during the period from 1971 to 1974 inclusive.
Replacement 34 PICT-3 carburetors are available; however they are Mexican-made replacements rather than German-made originals. This article will basically state how to remove and install this carburetor.
TOOLS NEEDED: Phillips screwdriver; flat-blade screwdriver; 8mm wrench; 13mm wrench.
Removing the carburetor is a pretty simple operation. I did this on a Karmann Ghia, so what I describe regarding the air cleaner will not apply to Beetles, but it should be apparent when looking at the air cleaner attachment to the carburetor how it comes off.
The first step is to remove the air cleaner sleeve from the top of the carburetor. The Karmann Ghia has a rubber sleeve that runs from the carb to the air cleaner, which is mounted on the right side of the engine compartment. There is a clamp at each end. Both clamps must be loosened using the Phillips screwdriver. Then pull the sleeve off of the carb and the air cleaner and set it aside.
Next remove the vacuum hose from the distributor to the carb. Simply pull it off the carburetor and pull the other end off the distributor. Set it aside.
Remove the vacuum hose from the EGR valve to the carb (if equipped). Just pull the hose off the EGR valve and off the carb, and set it aside.
Remove the wiring from the carburetor. You will find that there is a wire that runs from the positive (+) side of the coil to the electromagnetic cutoff valve on the left side of the carburetor. From there, another wire runs over the top of the carb and hooks to the automatic choke on the right side of the carb. Simply pull both these wires off the carb and set them aside. As long as the ignition is turned off, there is no hazard with doing this, but if it makes you feel better, go ahead and disconnect the battery ground strap.
Now use your 8mm wrench and loosen the bolt in the barrel clamp that holds the accelerator cable to the bottom of the throttle lever. Loosen the bolt, withdraw the cable from the throttle lever, then simply pull the barrel clamp out from the left side of the carb and set it where you won't lose it.
Now you need to remove the fuel line from the top of the carb. Hopefully there will be a clamp on both the fuel pump end of the hose and the carb end. If not, go buy some clamps before you put it all back together. Also, if those fuel lines are looking ratty, now would be a great time to replace them. How about that in-line fuel filter? What better time to replace it then when you have the line disconnected? Loosen the clamp at the carb end of the fuel line and then pull hard to get the fuel line off the fitting on the carb. Sometimes this can be really tough. You might get a couple drops of gasoline escaping the line when it pops off, but that should be about it. Keep the open end of the line above the level of the fuel pump. Plug it with something if it makes you feel better.
Now the only things holding the carb on are the two 13mm nuts where the carb attaches to the intake manifold. These nuts are on the bottom of the manifold and like to fall into strange and hard to reach places when you drop them after loosening them. Get your 13mm on the rearmost nut and loosen it until it can be loosened by hand, then go ahead and carefully remove it. If you drop it, use your handy magnetic pickup tool to find and retrieve it. Make sure you don't lose the washer either! After that one is removed, then do the same with the nut at the rear. This one is in a tight spot and you may find it easier to get a wrench on it if you first remove the distributor cap and place it out of the way. Simply pop the two clips on the distributor cap, remove it from the distributor, and set it aside (you can leave all the wires attached). Get your wrench on that frontmost nut and patiently loosen it, then very carefully remove it with your fingers. You are almost guaranteed to drop either the nut or the washer or both, so keep that magnetic pickup tool handy.
Now your carb is ready to come off. Just lift it straight up and there you go. If you are replacing it with a new one, you will want to drain the gasoline out of the old one before storing it. Find a gas can, open the lid, then take your 13mm nut and remove the bolt on the left side of the carb, near the bottom. This bolt is the float bowl drain plug. When you remove it, all the gasoline inside the float bowl will come out. Try to get it all in the gas can. You may also want to work the throttle lever a few times to make sure all the gas is pumped out of the carb's internals and the accelerator pump. Do this over the gas can, of course.
Once you have done what you need to do with the old carb or have gotten the new carb ready to install (remove all protective plastic pieces from the new carb), make sure to install a new gasket between the carb and manifold. The new carburetor will come with a new gasket. If you are re-using your old carb, gaskets are available separately from your friendly VW parts merchant.
Installation is pretty much the reverse of removal. Put the new carb onto the manifold (don't forget the gasket!), install the nuts and washers (very carefully), tighten them down. Attach the fuel line and clamp it. Attach the accelerator cable -- insert it into the barrel clamp, pull it toward the rear of the car SLIGHTLY to take out the slack, then hold it there while you tighten the barrel clamp. Re-attach the electromagnetic cutoff valve and choke wiring. Re-attach the vacuum lines for the EGR valve and for the distributor. Make sure you put the distributor cap back on if you removed it earlier. Re-install the air cleaner rubber sleeve.
If you are using a new carb and your engine has an alternator, there is a problem. You will find out that you won't be able to achieve full throttle because the accelerator pump linkage on the right side of the carb will interfere with the alternator case. There are two ways to deal with this. One way is to swap that part of the linkage from your old carb to the new carb. This is what I did, as I still had the original carb. It's not very complex -- there is a spring clip and a nut that must be removed from each carb, and then simply swap the accelerator pump adjusting mechanism from one carb to the other, and reinstall the nut and spring clip. The other way to deal with it is to grind a portion of the alternator case so that the new carb's linkage no longer interferes. I'll leave it up to you which one to choose.
If you re-installed your old carburetor, then it is already set up for your engine, so you're pretty much done. If you are installing a new carb, it needs to be set up properly. The best guide for this process is the Bentley manual, but if you don't have it, here are the instructions:
First, make sure that the spark plugs are clean and gapped properly. Be sure that your valves are properly adjusted, your points are properly adjusted, and your ignition timing is properly set. Below are two labeled pictures of the carb, one of the right side and one of the left side.

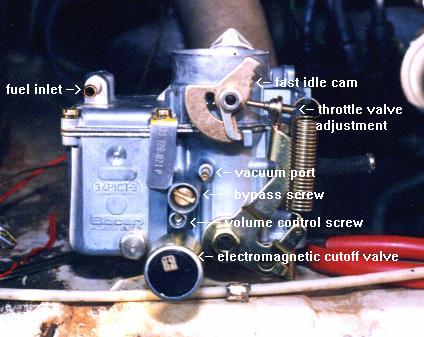
Look at the throttle lever (what the accelerator cable attaches to). At the top you will see a screw. The other end of the screw touches a weird-looking cam device. That cam device is part of the automatic choke and is called the fast idle cam. You need to loosen the screw until it is no longer touching the fast idle cam. Then tighten it again until it *just* touches the fast idle cam. Then tighten it another quarter turn.
Now you want to start the engine. The carb should be set up well enough so that the engine will at least start. Ideally you want it to start and warm up to operating temperature before you make your adjustments. Do not make any adjustments until the choke has opened completely!
Look at the left side of the carb. You will see two screws above the electromagnetic cutoff valve. The little one is called the volume control screw. The big one is called the bypass screw. The bypass screw controls how much air gets into the carb's idle circuit. The volume control screw controls how much fuel gets into the carb's idle circuit. So you are going to be using these two screws to set your idle mixture and idle speed.
Once the engine has warmed up and the choke is fully open, stop the engine. You want to slowly turn the volume control screw in until it stops. Don't force it at the stop or you will damage the carb. Just turn it in until it bottoms out lightly. Once it bottoms out, turn it back out 2.5 to 3 turns.
Now connect a dwell/tach to the engine and start it. When it is running, you are going to use the bypass screw to adjust the idle speed to 800-900 rpm. Turning it in will generally reduce the idle speed, and turning it out will generally increase it.
Once you have done that, you want to turn the volume control screw out until you get the fastest obtainable idle speed. Stop turning it out when the idle speed does not increase anymore. After you have stopped, turn it back in until the engine speed drops by 20 to 30 rpm.
After you have done that, then reset the idle to 800-900 rpm using the bypass screw.
I know it's a goofy procedure, but you have to do it that way. Also, you will probably have to adjust the automatic choke on a new carb. I have a procedure for that.
Additionally you may find that you have to adjust the accelerator pump for smooth acceleration. That is a separate article altogether, though the Bentley manual covers the procedure pretty well.
That pretty much covers the carburetor removal and installation. Double check your work to make sure you won't be having any fuel leaks, etc.
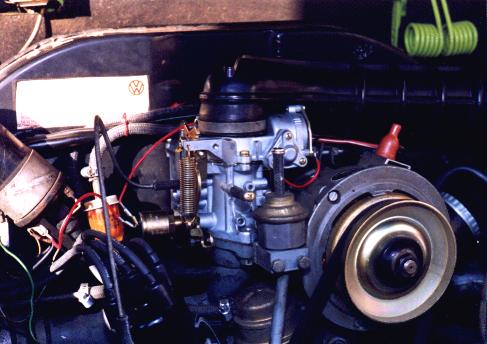
This is what it should look like:
Sean Bartnik
November 13, 1998
Back to the tech page.
