Type I Engine Exhaust Leak: Muffler Flange Installation
by Ken Hooper
Thus spake Hoover:
"I prefer to use welded, flanged fittings between my heat exchangers and the muffler..."

And in the If I Can Do This Then Any Other Idiot Can Too department, put the flanges on when you put the muffler on. This eliminates the hackneyed little ring clamps and their tendency to leak loudly and shoot carbon monoxide into your heating system.
==Interregnum One: This involves welding. Don't get scared. I did it with a tiny little oxy-MAPP torch that costs like $35 at Home Depot, although I went through an alarming number of $7 disposable oxygen cartridges before the job was through. When I asked about this little torch on the list a lot of knowledgable people said "don't bother with that", and nobody said "DO bother with that", so of course I had to go and buy one.
==Although supplies for it are expensive I do not regret buying it. This thing is capable of field repairs if they don't require more than 10 minutes or so of welding, especially if you pre-heat with a straight propane torch before you start. A portable welder that's not much bigger than a shoe box is, I think, a good thing to carry with you, particularly if you find you have lost your lighter and have nothing to light cigarettes with. One must be well-prepared when camping.
==A cheap real gas torch goes for $150 at your local welding supply and uses the cheap returnable oxygen bottles. You know you want one and think how much cheaper it is than a MIG.
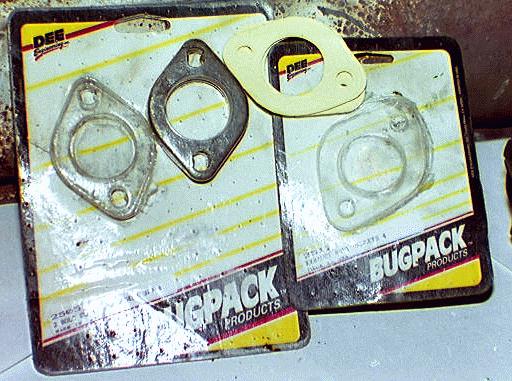
The flanges cost $6 from Kymco. Comes with gaskets, bolts and copper nuts (I do hope they weren't merely copper plated but I didn't check). They work like the flanges on the exhausts of all other cars. If you don't know what I'm talking about, go crawl under the nearest Toyota and look where the exhaust pipes bolt to the catalytic convertor. The cat is the big bulgy thing covered with steel braid about halfway back. Like that.
One of the flanges butts up against the flared part on the front of the muffler and the tube from the heater box goes through the other flange and on into the flare. There isn't any cutting involved. These things do not fit tight, not even close, you can't braze them on because there's a lot of space to fill.
To install, I went ahead and pulled the engine so I could see what I was doing. I didn't want to do my first welding upside-down on my back. But I'm sure you could install them with the engine in by taking off the old muffler, supporting the engine, and removing the rear engine support. Either way, you'll have to bolt the whole exhaust together before you weld so everything fits together.
==Interregnum Two: DO NOT USE the gaskets that come with the flanges. These are made of white stuff that seems remarkably like paper but is not. Instead, get some sheet asbestos and cut your own gaskets using the ones supplied as a pattern. The reason is, if you weld the thing up with the supplied gaskets in place you can't take the muffler off again (to install the engine support or for any other reason later on) because the gasket will come off in pieces. You cannot use the "tin sandwich" exhaust gaskets you use at the manifolds here because they aren't big enough to fit over the heater tube, so you'll be stuck with no gaskets at all. NAPA can get the sheet asbestos. Ask me how I know this. ;/
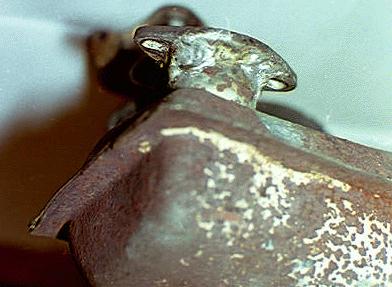
Having bolted the exhaust system on (with the flanges and their gaskets bolted together and hanging loose on the heater tubes) I butted the flanges against the flared part of the muffler, "blocked" it in place with vise-grips, and welded away. Be careful of accidentally welding the nuts & bolts to the flanges, there's not much room between them and you want to be able to take the thing off again someday.
This took me a long time and my greenhorn amateur welds had a lot of warts, but eventually it was all together. Let cool, unbolt exhaust, install engine support, re-install WITH COPIOUS ANTI-SEIZE, run and check for leaks. Not tough. Excellent, useful, safe, low-cost mod.
==Interregnum Three: If you have on of those patios made of cement with the little brown pebbles in it? And you are welding close to the ground? It makes the pebbles explode and shoot shrapnel at your eyes. Ask me how I know this. ;/
(Images of supremely ugly welding courtesy of Ron Van Ness' House of Coat Hanger Welding Inc. These amateur welds lasted longer than the muffler.)
Ron's note: I used Bugpack brand 1-3/8" flange kit for both the muffler and heat exchanger. Not all BugPack products work as advertised, but at these flanges get my seal of approval. Gene Berg sells a few different kits that complement various extractor/muffler combinations. The local muffler shops I visited didn't have such small (1-3/8") flanges in stock, so buy them in advance before getting torch happy.